Whatsapp-Campaign
Key Features of WhatsApp Campaigns
1. Targeted Audience Segmentation
Create audience segments based on customer demographics, behavior, or purchase history to ensure your message reaches the right people.
2. Dynamic Personalization
Include placeholders (e.g., name, order_id) in your message to customize content for each recipient, increasing engagement.
3. Rich Media Support
Attach images, videos, links, or documents to enhance your messages and convey your content effectively.
4. Scheduled Campaigns
Plan campaigns in advance by setting specific dates and times for message delivery.
5. Automated Triggers
Set up automatic campaigns based on events, such as abandoned carts, order confirmations, or payment reminders.
6. Template-Based Messaging
Use pre-approved templates to ensure compliance with WhatsApp Business policies for transactional and promotional messages.
7. Real-Time Analytics
Monitor campaign performance with insights such as delivery rates, open rates, click-through rates, and customer responses.
Steps to Create a WhatsApp Campaign
Step 1: Navigate to the Campaign Section
- Log in to your marketing platform.
- Go to the Campaigns section.
Step 2: Start a New Campaign
- Click on Create Campaign.
- Enter a Campaign Name for easy identification.
Step 3: Select an Audience
- Choose an existing audience segment from your contact list or create a new one.
- Upload a CSV file of contacts if needed, ensuring all numbers are in the international format with country codes.
Step 4: Design Your Message
- Choose a Template: Select a pre-approved WhatsApp template for your message. If no template suits your needs, create and submit a new one for approval.
- Personalize the Content: Replace placeholders with relevant customer data (e.g., customer_name, order_ids).
- Add Rich Media (optional): Attach images, videos, or links to make the message engaging.
Step 5: Configure Campaign Settings
- Set the Delivery Schedule: Send immediately or schedule for a future date and time.
- Set the Frequency (for recurring campaigns): Daily, weekly, or custom intervals.
- Enable Tracking Options: Add UTM parameters to measure traffic from WhatsApp to your website or app.
Step 6: Preview and Launch
- Preview the message to ensure everything looks correct.
- Confirm the campaign settings.
- Click Launch Campaign.
Best Practices for WhatsApp Campaigns
1. Ensure Opt-In Compliance
- Only send messages to customers who have explicitly opted in to receive WhatsApp communication from your business.
2. Segment Your Audience
- Group customers based on their preferences, behavior, or demographics to send more relevant messages.
3. Use Personalization
- Include the customer’s name or order details to make the message feel tailored and authentic.
4. Leverage Rich Media
- Use images, videos, or documents strategically to make your campaign visually appealing.
5. Avoid Spamming
- Limit the frequency of campaigns to avoid overwhelming customers and risking account suspension.
6. Analyze and Optimize
- Review campaign analytics to identify what works and improve future campaigns.
Benefits of WhatsApp Campaigns
1. High Engagement Rates
- WhatsApp messages have significantly higher open and response rates compared to email or SMS.
2. Direct Customer Interaction
- Enable two-way communication to receive customer feedback and inquiries directly.
3. Global Reach
- Connect with customers across the globe using WhatsApp’s widespread user base.
4. Cost-Effective Marketing
- Reduce marketing costs by using an efficient and scalable communication channel.
Use Cases for WhatsApp Campaigns
1. Promotions and Discounts
- Notify customers about sales, limited-time offers, or exclusive discounts.
2. Event Announcements
- Send invitations, updates, and reminders for webinars, product launches, or store openings.
3. Transactional Updates
- Inform customers about order status, payment confirmations, and delivery updates.
4. Feedback and Surveys
- Collect customer feedback or conduct surveys to improve services.
5. Abandoned Cart Recovery
- Remind customers to complete their purchases with personalized cart recovery messages.
Steps to Create a WhatsApp Campaign
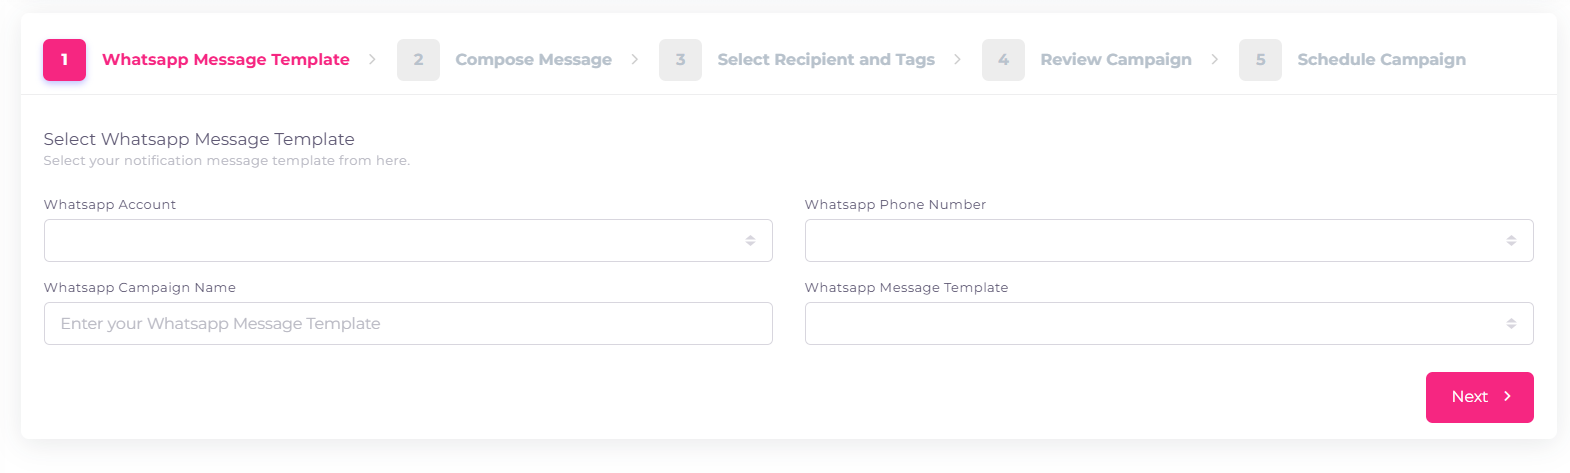
1.Configure the WhatsApp Campaign:
-
Select WhatsApp Account
- From the dropdown menu, choose the WhatsApp account that you want to use for the campaign.
-
Enter WhatsApp Phone Number
- Provide the phone number linked to the WhatsApp account.
-
Name Your WhatsApp Campaign
- Fill in the campaign name for easy identification in future references.
-
Select WhatsApp Message Template
- Use the dropdown to select the pre-approved WhatsApp message template that will be sent as part of the campaign.
-
Proceed to the Next Step
- Once all fields are completed, click the "Next" button to move to the next stage in the campaign creation process, such as composing the message or selecting recipients.
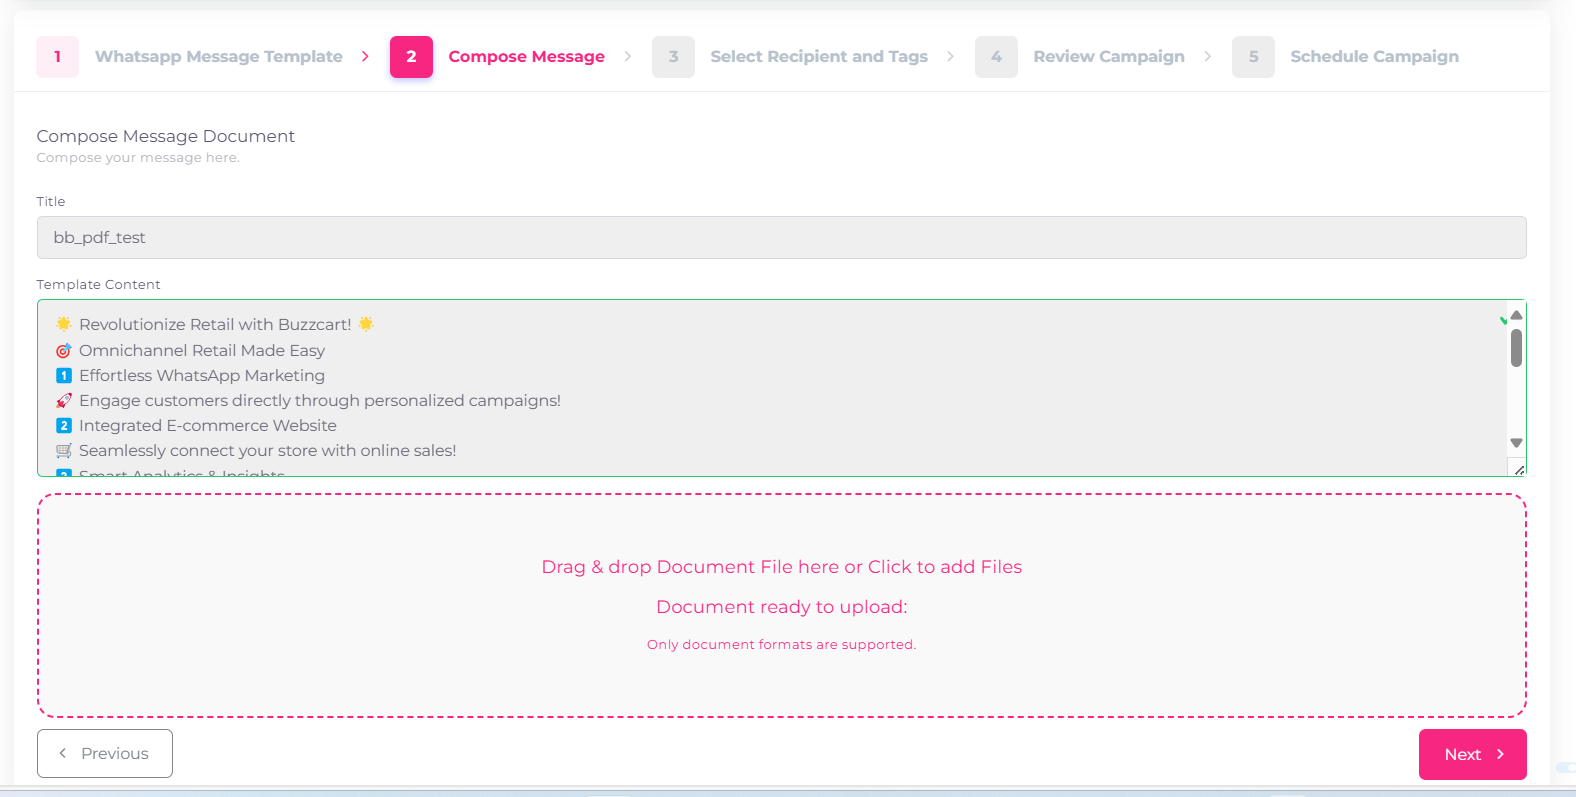
2.Compose the WhatsApp Message:
-
Provide a Title
- Enter a title for your message in the "Title" field. For example,
bb_official_omnichannel_template_1.
- Enter a title for your message in the "Title" field. For example,
-
Edit the Template Content
- Write or customize the content in the "Template Content" section. This includes the main message that will be sent to the recipients.
- Example in the image:
📢 Go Omnichannel with BrainyBuzz Solution! 🚀
It’s time to skyrocket your business to new heights with our all-in-one platform:
✅ Email Marketing to stay connected
✅ E-commerce Website for seamless sales
✅ Social Tools to grow your reach
✅ Wholesale Solutions for bulk deals
-
Verify the Content
- Ensure that the message aligns with the approved template and is error-free. The green checkmark indicates that the content is valid.
-
Proceed to the Next Step
- After confirming the content, click the "Next" button to continue to the recipient selection phase.
-
Navigate Back if Needed
- If adjustments are required in the previous step, use the "Previous" button to go back.
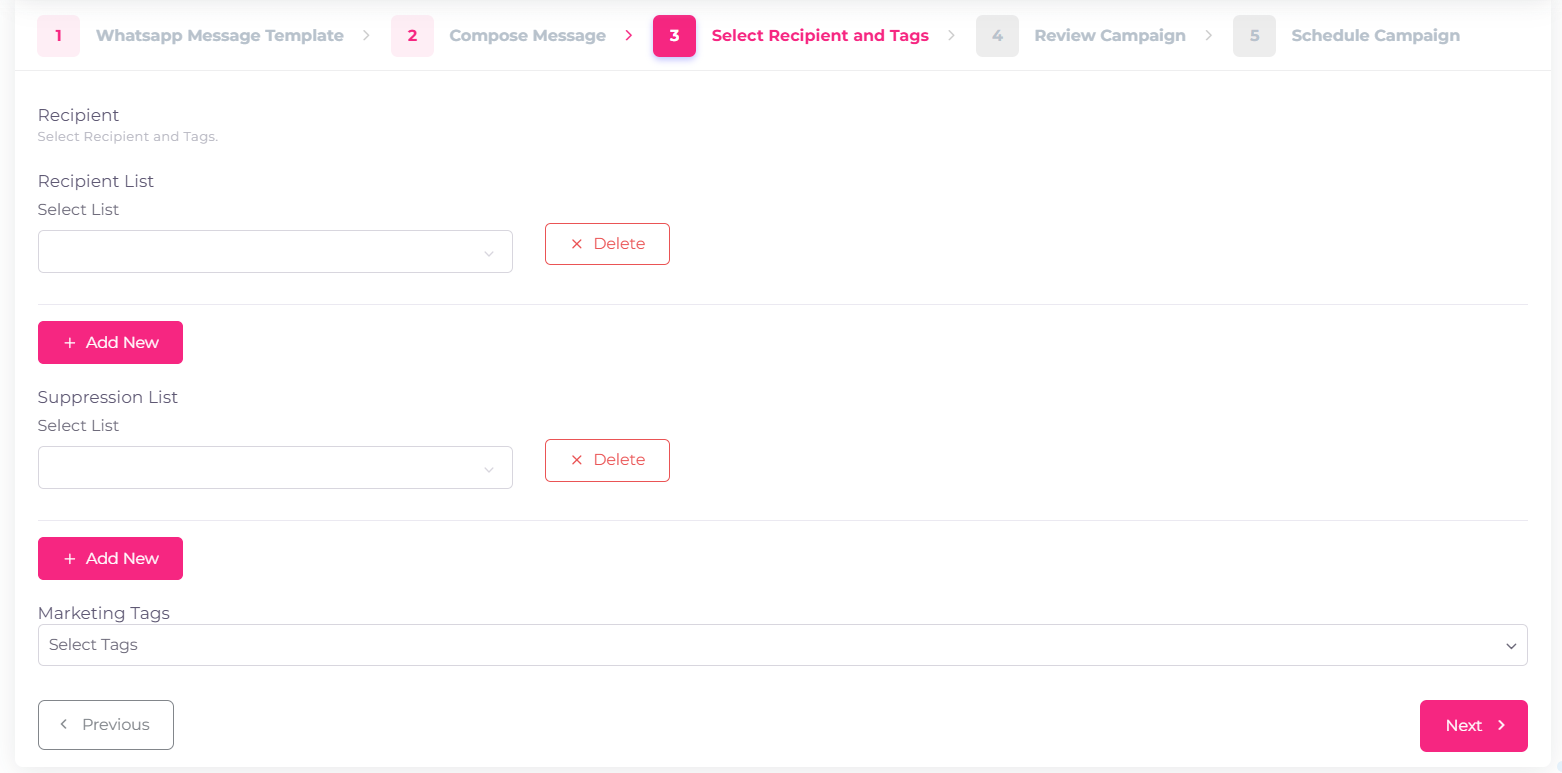
3. Select Recipients and Tags:
-
Select Recipient List
- From the dropdown under "Recipient List," choose the list of recipients you want to target for this campaign.
- Use the "+ Add New" button to add more recipient lists if needed.
- To remove a recipient list, click the "Delete" button.
-
Set Suppression List (Optional)
- If there are any recipients you want to exclude, choose a suppression list from the dropdown under "Suppression List."
- Use the "+ Add New" button to add more suppression lists if required.
- Remove unwanted suppression lists by clicking "Delete."
-
Apply Marketing Tags
- Use the dropdown under "Marketing Tags" to select tags that categorize or segment your recipients further.
-
Navigate Back if Necessary
- If you need to make changes to previous steps, click the "Previous" button.
-
Proceed to the Next Step
- After completing all selections, click the "Next" button to continue to the next stage (e.g., reviewing the campaign).
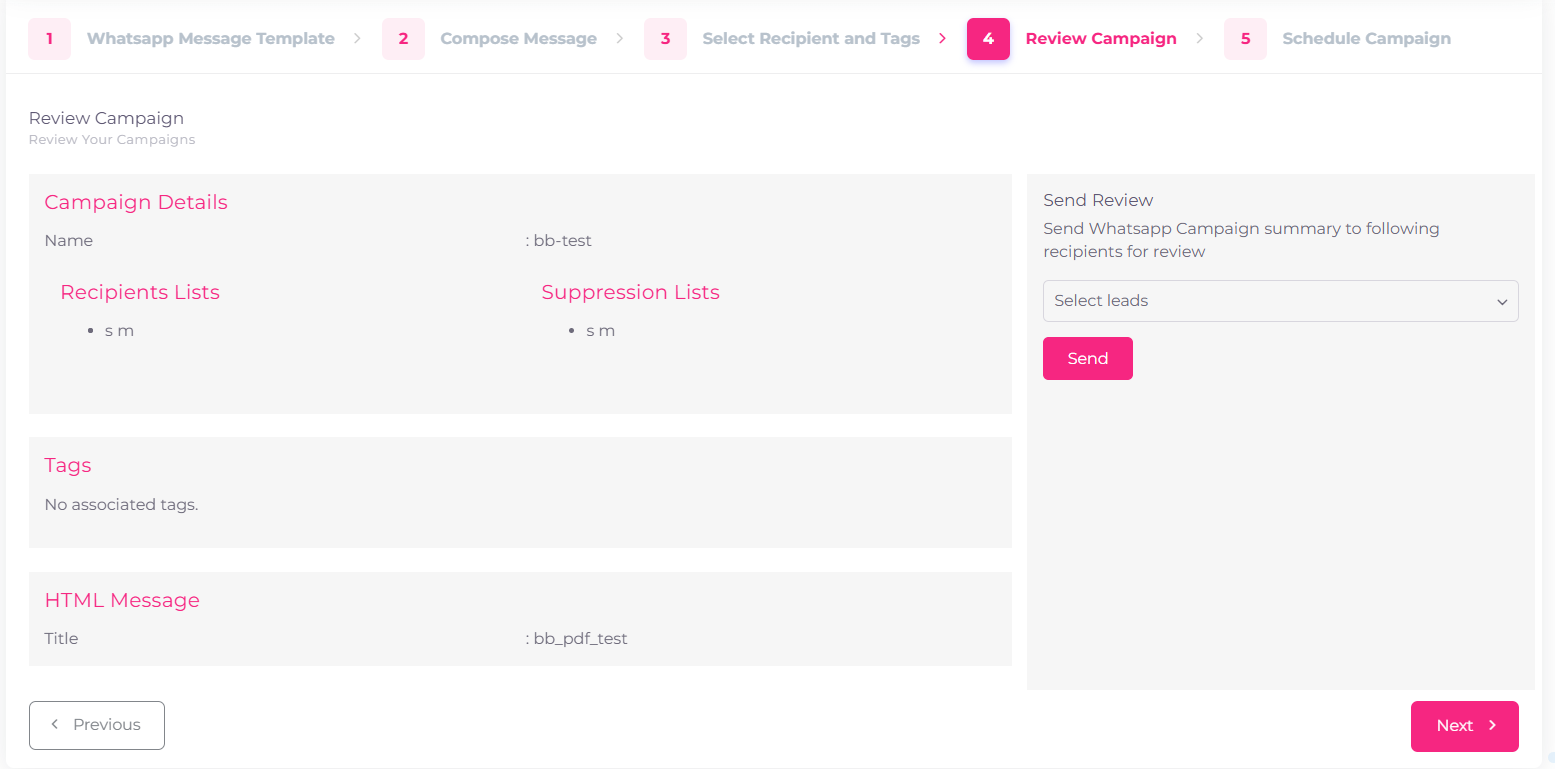
4.Review Campaign:
-
Review Campaign Details
- Check the campaign details under Campaign Details, including:
- Name: Ensure the campaign name is correct.
- Recipients Lists: Verify the recipient lists selected for the campaign.
- Suppression Lists: Ensure any exclusion lists are properly applied.
- Check the campaign details under Campaign Details, including:
-
Verify Tags
- Under Tags, confirm the associated marketing tags for this campaign.
-
Check HTML Message
- Review the title and content of the message to ensure everything is as planned.
-
Send Campaign for Review
- On the right-hand side, select leads from the dropdown under Send Review to send the campaign summary for approval or testing.
- Click the "Send" button to initiate the review process.
-
Navigate Back if Needed
- If changes are necessary, click the "Previous" button to return to the previous steps.
-
Proceed to the Next Step
- Once you’ve confirmed all details, click the "Next" button to move to the final step, scheduling the campaign.
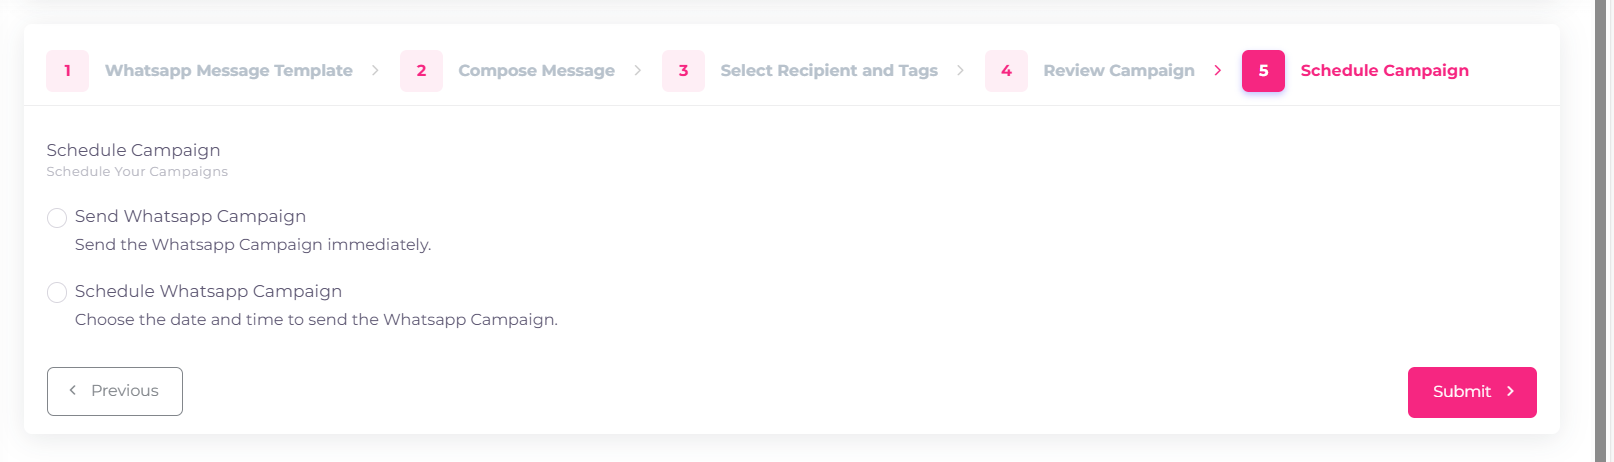
5. Schedule Campaign:
-
Choose an Option
- Select one of the following options:
- Send WhatsApp Campaign: If you want to send the campaign immediately, select this option.
- Schedule WhatsApp Campaign: If you prefer to send the campaign later, choose this option to specify a date and time.
- Select one of the following options:
-
Schedule the Date and Time (if applicable)
- If you selected Schedule WhatsApp Campaign, a date and time picker will appear. Use it to set the desired schedule.
-
Go Back for Changes (Optional)
- If you need to make any changes, click the "Previous" button to return to the earlier steps.
-
Submit the Campaign
- Once everything is set, click the "Submit" button to finalize and send or schedule the campaign.